The Easiest No-Bake Toblerone Cheesecake: A Sweet Escape!
Hey, foodies! 🍰 Lila here, and today I’m about to take you on a delightful journey into the world of no-bake desserts. Imagine creamy cheesecake, the goodness of chocolate, and none of the heat from the oven. Sounds dreamy, right? Welcome to my take on a No-Bake Toblerone Cheesecake that’s so good it’ll make your taste buds dance!
A Sweet Memory with Toblerone
Before we dive into the recipe, let me share a little story. I’ll never forget the first time I tried Toblerone chocolate. I was a young culinary enthusiast, sitting in a cozy little café in Switzerland, surrounded by breathtaking mountains and snowy peaks. As I took that first bite of the triangle-shaped delight, I was transported to chocolate heaven! The smooth, creamy chocolate with nougat and almond bits was an experience I wanted to recreate. Over the years, I’ve played around with recipes, but this Toblerone cheesecake is where nostalgia meets easy indulgence. Not only does it remind me of that delightful moment, but it also brings joy to anyone who takes a bite!
So, grab your apron, and let’s create some unforgettable cheesecake magic together!
Ingredients You’ll Need
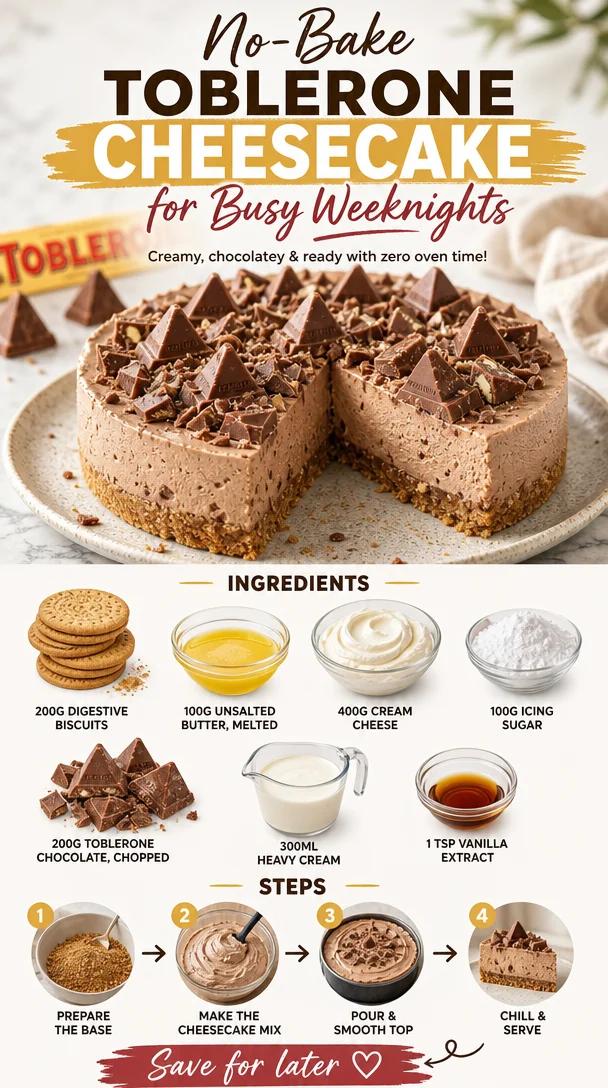
Here’s what you’ll need to whip up this deliciousness:
- 200g Digestive Biscuits
- These serve as the perfect base for our cheesecake, adding that delightful crunch. If you can’t find digestive biscuits, graham crackers work beautifully as a substitute!
- 100g Unsalted Butter, melted
- This gives our crust the richness it needs. Remember, unsalted is key here so you can control the saltiness of your cheesecake.
- 400g Cream Cheese
- A smooth, creamy texture is what we’re aiming for! If you prefer a lighter version, you can swap it for a low-fat cream cheese.
- 100g Icing Sugar
- This sweetens our cheesecake and helps achieve that smooth texture. You can replace icing sugar with granulated sugar, just add a bit of cornstarch to keep it smooth.
- 200g Toblerone Chocolate, chopped
- The star of the show! You can replace this with any chocolate you love, but trust me, Toblerone adds a unique flavor that’s hard to beat.
- 300ml Heavy Cream
- Whipping this creates that cloud-like texture. If you’re looking for a dairy-free option, coconut cream works surprisingly well!
- 1 tsp Vanilla Extract
- This adds a warm, rich flavor. If you love experimenting, almond extract can give a fun twist!
Step-by-Step Instructions
1. Prepare the Biscuit Base
In a food processor, crush the digestive biscuits into fine crumbs. You want them to resemble beach sand! 🌊
Chef’s Tip: If you don’t have a food processor, place the biscuits in a ziplock bag and crush them using a rolling pin. It’s a fun workout, too!
2. Combine with Butter
In a bowl, mix the cold biscuit crumbs with the melted butter until it’s all well coated.
Chef’s Insight: The mixture should hold together when pressed. If it’s too crumbly, add a tad more melted butter.
3. Press into the Pan
Press the crumb mixture into the bottom of a 9-inch springform pan using the back of a spoon or your fingers. Make sure it’s evenly packed!
Tip: For the ultimate crunch, pop it in the fridge for 10-15 minutes while you prepare the filling.
4. Melt the Toblerone Chocolate
In a heatproof bowl, melt the chopped Toblerone over simmering water (double boiler method). This will ensure you get that silky texture without burning it.
Chef Hack: Alternatively, microwave it in 30-second intervals, stirring in between!
5. Make the Cream Cheese Mixture
In another large mixing bowl, beat the cream cheese and icing sugar together until smooth and creamy.
Chef’s Note: Ensure the cream cheese is at room temperature for the best results. Cold cream cheese can leave little lumps.
6. Whip the Cream
In a separate bowl, whip the heavy cream until it forms stiff peaks. It should look like fluffy clouds when you lift the whisk!
Pro Tip: Chill your bowl and whisk for 10 minutes before whipping for extra fluffy results.
7. Fold It All Together
Gently fold the melted Toblerone into the cream cheese mixture, then carefully fold in the whipped cream until everything is blended well.
Reminder: Be gentle! You want to keep that airy texture of the whipped cream.
8. Pour into the Crust
Pour the luscious cheesecake mixture over your chilled biscuit base, spreading it out evenly with a spatula.
9. Chill, Chill, Chill
Cover the springform pan with plastic wrap and chill in the fridge for at least 4 hours, or overnight if you can resist. 🙈
10. Serve and Enjoy!
When you’re ready to serve, carefully remove the cheesecake from the pan. You can garnish it with extra Toblerone, whipped cream, or fresh berries for that Instagram-worthy touch.
Serving Tip: Cut into slices and serve chilled—let your guests enjoy every rich, creamy bite!
Recipe Variations
Feeling adventurous? Here are some fun twists you can try with this recipe:
- Nutty Toblerone: Add crushed nuts like almonds or hazelnuts to the biscuit base for added texture and flavor.
- Fruit Fusion: Toss in some crushed raspberries or strawberries into the cheesecake mix before chilling for a fresh burst of fruitiness.
- Minty Freshness: Add a few drops of peppermint extract to give your cheesecake a refreshing mint twist – perfect for holiday gatherings.
- Mocha Delight: Mix in a tablespoon of coffee granules dissolved in hot water for a mocha-flavored cheesecake. Pair it with dark chocolate Toblerone for a rich flavor combo!
- Caramel Drizzle: Drizzle some salted caramel sauce over each slice before serving for that added decadence!
Chef’s Notes
This No-Bake Toblerone Cheesecake has been a go-to for celebrations and casual get-togethers. I love how versatile and forgiving it is. The first time I made it, I accidentally used almond butter instead of melted butter. You know what? It actually added a delicious twist!
Over time, I’ve also played around with adding different flavors, and it’s fun to see how a little tweak can change the whole vibe of the dish. The beauty of cooking is that it allows you to experiment while sharing delicious moments with friends and family.
Make sure to snap a picture before devouring and share it—tag me on your foodie journey! 📸✨
FAQs and Troubleshooting
1. My Cheesecake Didn’t Set Properly. What Went Wrong?
If your cheesecake is still runny after chilling, it may need more time in the fridge. Be sure to let it chill for at least 4 hours or longer for the right texture. If using low-fat ingredients, they often have more moisture, which can affect the setting.
2. Can I Use a Different Type of Chocolate?
Absolutely! Dark chocolate, milk chocolate, or even white chocolate can be used, but keep in mind the flavor profile will change. Just ensure that it’s high-quality chocolate for the best results.
3. How Can I Make Individual Servings?
This cheesecake can easily be adapted into individual cups or mini cheesecakes. Just layer the biscuit base and cheesecake mixture in small cups or jars, and chill them! Perfect for parties!
4. What’s the Best Way to Store Leftovers?
If you somehow have leftovers (I mean, unlikely, but just in case!), store them in an airtight container in the fridge. It should last for 3-4 days. Just remember to enjoy it chilled for that creamy texture.
Nutritional Info (Optional)
Calories per slice: approximately 400
Total fat: 30g
Saturated fat: 18g
Carbohydrates: 30g
Sugars: 18g
Protein: 6g
And there you have it, my friends! A deliciously simple No-Bake Toblerone Cheesecake that’s perfect for any occasion. So let’s scroll less, cook more, and create something unforgettable together. Happy cooking! 🍫💖