Unleash the Flavor: Jalapeño Popper Taco Bake Recipe
Welcome to my kitchen, food lovers! Today, we’re diving into a dish that’s close to my heart and packed with flavor—Jalapeño Popper Taco Bake! If you’re looking for a meal that’s not only delicious but also easy to whip up during the busiest of weeks, buckle up, because this one’s a game-changer. Think of the perfect marriage between tacos and the spicy goodness of jalapeño poppers. Yep, that’s right—we’re taking two favorites and cranking up the comfort food factor!
A Personal Story: A Flavorful Memory
I vividly remember the first time I attempted to make jalapeño poppers. It was during a friend’s casual get-together, and I thought I’d impress everyone with my culinary prowess. I stuffed those jalapeños with a delightful mix of cream cheese and spices, wrapped them in bacon (because, bacon, right?), and popped them into the oven. As the cheesy goodness melted and the aroma enveloped the room, my friends were already gathering, excited to try my creation.
Fast forward to the moment they took their first bite—pure bliss! The sweet heat of the jalapeños was perfectly balanced with the creamy, cheesy filling. Little did I know that this small dish would inspire me to evolve it into a heartier meal: the Jalapeño Popper Taco Bake. This recipe brings that vibrant spirit of the original dish and combines it with the richness of taco night. Trust me, you and your party guests are going to love it!
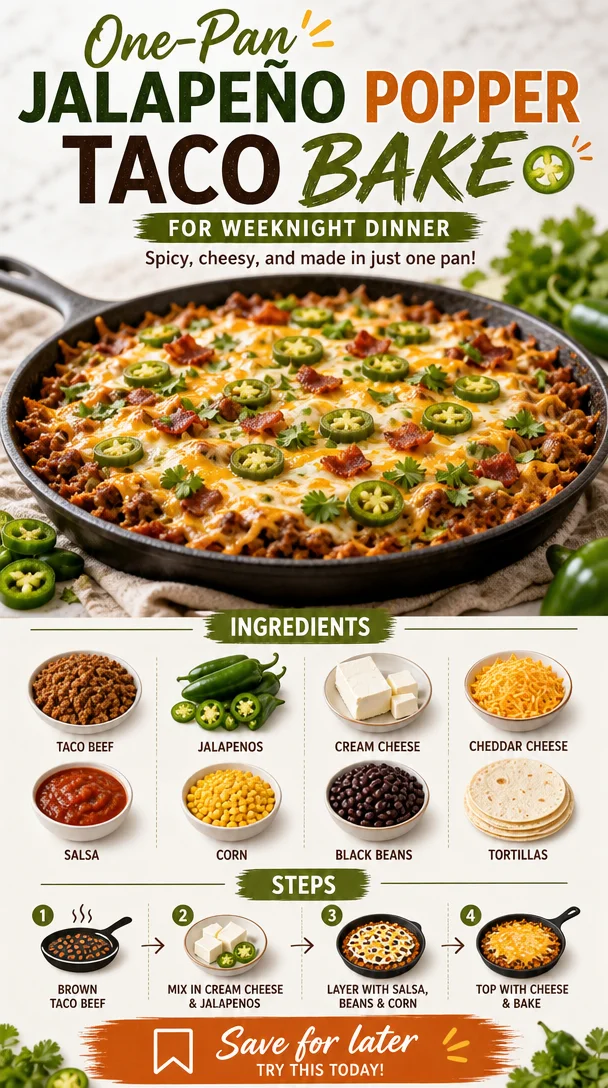
Ingredients
Let’s gather what we need for our Jalapeño Popper Taco Bake! Here’s what you’ll need to bring the flavor:
-
Taco Beef
- Ground beef seasoned with taco spices. You can substitute it with chicken, turkey, or even a plant-based alternative for a lighter or vegetarian option.
-
Fresh Jalapeños
- These fiery little gems provide the kick! If you prefer a milder flavor, use banana peppers or bell peppers instead.
-
Cream Cheese
- The star of the show that adds richness and creaminess. For a lighter version, opt for low-fat cream cheese or Greek yogurt.
-
Shredded Cheese (Cheddar and Pepper Jack)
- A blend of both gives a delightful meltiness and flavor contrast. Don’t hesitate to try your favorite cheese blends!
-
Taco Seasoning
- Store-bought or homemade, this mix adds depth to your beef. Spice it up with some extra chili powder or smoked paprika for a flavor boost.
-
Taco Shells or Tortillas
- Soft or crunchy, you choose! Corn tortillas are gluten-free while flour tortillas give a lovely chewiness.
-
Sour Cream or Avocado (for serving)
- Add a cool touch to balance the heat. Avocado salsa or guacamole works beautifully too!
Step-by-Step Instructions
Now that we have our ingredients ready, let’s get cooking! Follow these steps, and you’ll have an amazing dish on the table in no time.
-
Preheat Your Oven
- Preheat to 375°F (190°C). A hot oven ensures our taco bake gets bubbly and golden.
-
Brown the Meat
- In a skillet over medium heat, brown the taco beef (or your chosen protein) until fully cooked. This usually takes about 6-8 minutes.
- Chef Tip: Drain excess fat if necessary—leave a little for flavor, but too much can make it greasy!
-
Add Taco Seasoning
- Stir in taco seasoning and about 1/4 cup of water. Mix well and let it simmer for 2-3 minutes until thickened.
- Chef Insight: For a homemade blend, mix equal parts chili powder, cumin, garlic powder, and onion powder with a pinch of salt.
-
Prepare the Jalapeños
- While the meat is cooking, slice some jalapeños in half lengthwise and remove the seeds if you want less heat.
- Pro Tip: Wear gloves when handling jalapeños! You don’t want that spicy oil lingering on your hands (or in your eyes!).
-
Make the Cream Cheese Mixture
- In a bowl, mix the cream cheese with 1 cup of shredded cheese (reserve some for topping) and some chopped jalapeños (to taste). Stir until combined and creamy.
-
Layering the Bake
- In a 9×13-inch baking dish, start by layering taco beef evenly at the bottom.
- Next, dip the jalapeño halves into the cream cheese mixture and place them face down on the beef.
-
Add Taco Shells
- Break taco shells or tortillas into smaller pieces and layer them over the cream cheese-stuffed jalapeños.
- Chef Hack: Alternating layers adds a delightful texture!
-
Top It Off
- Sprinkle the remaining cheese over everything, letting that gooey goodness seal the deal.
-
Bake to Perfection
- Pop your dish into the preheated oven and bake for 25-30 minutes until everything is hot and bubbly. The cheese should be melted and slightly golden on top.
-
Let it Chill
- Once done, remove from the oven and let it cool for about 5-10 minutes. This helps it set and makes serving easier.
Serving Suggestions
When it’s finally time to serve, there’s no need to fuss over fancy plating. Just dive in! But here are some fun ideas:
- Serve it family-style in the baking dish. Let your guests scoop out their portions with a slotted spoon.
- Add a dollop of sour cream or a sprinkle of fresh cilantro for an extra splash of color and flavor.
- Pair it with a side of vibrant salsa or a refreshing cucumber salad to balance the richness.
Recipe Variations
Want to get creative? Here are some variations to take this recipe to the next level:
- Vegetarian Delight: Swap the taco beef for black beans or quinoa for a satisfying vegetarian option.
- Spicy Kick: Mix in some diced green chilies or use habanero cheese for those who love authentic heat.
- Creamy Ranch Twist: Mix some ranch seasoning into the cream cheese for a zesty touch.
- BBQ Fusion: Drizzle some BBQ sauce on top before baking for a sweet and tangy flavor profile.
- Breakfast Taco Bake: Replace the beef with scrambled eggs, add some diced tomatoes, and enjoy as a hearty breakfast dish!
Chef’s Notes
I love that every recipe can evolve over time! The Jalapeño Popper Taco Bake started as a fun experiment and has turned into a staple in my cooking repertoire. Whenever I need to clean out the fridge or impress guests with minimal effort, this dish is my go-to.
And hey, every time I make it, I love to switch up the toppings and spices based on what I have on hand. It’s like a little culinary adventure every time! Plus, it’s always a crowd-pleaser—who can resist cheese and spice wrapped in taco goodness?
FAQs and Troubleshooting
-
Why is my taco bake watery?
- This could happen if there’s too much moisture from the meat or veggies. To fix it, try draining excess liquid before assembling, or add a thickening agent, like cornstarch, to the beef.
-
Can I make this ahead of time?
- Absolutely! Prep the taco bake in advance, cover it, and store it in the fridge for a day. When you’re ready to cook, just pop it in the oven. You might need to add a few extra minutes to the baking time.
-
How do I store leftovers?
- Keep any leftovers in an airtight container in the fridge for up to 4 days. For longer storage, freeze individual portions and reheat in the oven or microwave.
-
What if the jalapeños are too spicy?
- If you find it too spicy, remove the seeds and membranes—these parts hold the most heat. You can also use less jalapeño or choose milder peppers altogether.
Nutritional Info
While each ingredient brings its flair, here’s a quick glance if you’re keeping an eye on numbers (per serving):
- Calories: Approximately 450
- Protein: 22g
- Fat: 30g
- Carbohydrates: 30g
- Fiber: 3g
Feel free to adjust ingredients to fit your dietary needs, and remember—cooking is all about having fun and enjoying what you create!
There you have it: your complete guide to making a mouth-watering Jalapeño Popper Taco Bake! I can’t wait for you to bring this recipe into your kitchen and enjoy every flavorful bite. Let’s get cooking, and most importantly, let’s savor those moments spent around the table with loved ones. Happy cooking! 🍴✨