Oatmeal Cream Pies: A Nostalgic Delight
Hello, my fellow food lovers! Lila here, and today I’m bringing you the ultimate flavor blast from the past: Oatmeal Cream Pies! These delightful cookies are not just sweet treats; they hold a special place in my heart. Let’s take a stroll down memory lane, shall we?
I remember when I was a kid, visiting the local grocery store with my parents. My eyes would light up at the sight of those shiny packages in the snack aisle. I’m pretty sure the first time I snagged an Oatmeal Cream Pie, it felt like unwrapping a treasure. The chewy oats, the sweet cream filling, and that nostalgic flavor—oh, the joy! It became my go-to treat after school, a little hug in cookie form.
Growing up, I couldn’t shake the idea of recreating those scrumptious cookies myself. So I hit the kitchen, and wow, did I learn a thing or two along the way! Today, I’m excited to share my version of Oatmeal Cream Pies, with a few little twists to make them even more incredible. Ready? Let’s dive in!
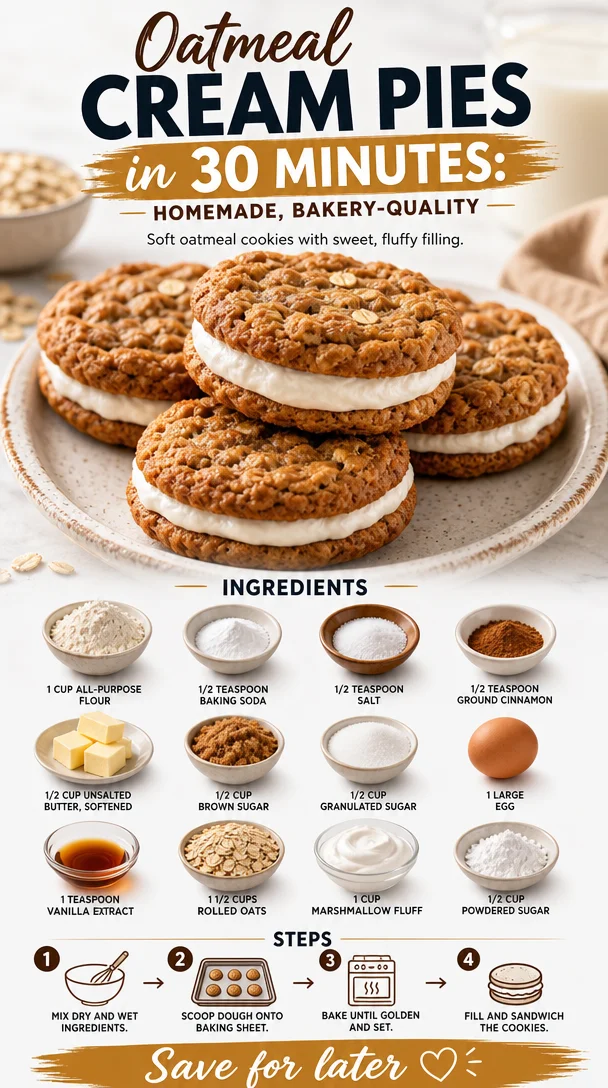
Ingredients
Here’s what you’ll need to whip up these delightful treats:
-
1 cup all-purpose flour
The base of your cookie! You can swap this with whole wheat flour for a nuttier flavor or a gluten-free blend if you’re looking for a gluten-free option. -
1/2 teaspoon baking soda
This little helper gives your cookies the perfect lift. Don’t have baking soda? Baking powder can work in a pinch, but it will change the texture a bit. -
1/2 teaspoon salt
A pinch of salt enhances the flavor of sweet treats. If you’re on a low-sodium diet, you can skip it, but it’s totally worth adding! -
1/2 teaspoon ground cinnamon
It brings warmth and warmth to the flavor profile. You could also swap it for nutmeg or pumpkin pie spice for a twist! -
1/2 cup unsalted butter, softened
Adds rich, creamy goodness. You can substitute with coconut oil or vegan butter for a dairy-free version. -
1/2 cup brown sugar
This gives your cookies a deep, caramel-like flavor and moisture. Feel free to use coconut sugar for a healthier alternative. -
1/2 cup granulated sugar
For sweetness and that lovely texture. You can use a sugar substitute if you need to cut back on the sugar. -
1 large egg
Acts as a binder and adds richness. If you’re vegan or allergic, a flax egg (1 tablespoon ground flaxseed mixed with 2.5 tablespoons water) is a great substitute. -
1 teaspoon vanilla extract
A must-have for elevating flavors. Want something different? Try almond extract for a unique twist! -
1 1/2 cups rolled oats
The star of the show! These give you that chewy texture. Instant oats work, but I love the hearty texture of rolled oats. -
1 cup marshmallow fluff
The center filling! You can use whipped cream cheese for a unique tangy twist or make your own fluff if you’re feeling adventurous. -
1/2 cup powdered sugar
This is for sweetening the fluff filling. You could use a sugar substitute, but the sweetness level may vary.
Step-by-Step Instructions
Let’s get baking! Here’s how to create these creamy delights step-by-step:
-
Preheat your oven to 350°F (175°C)
Preheating is essential for even baking, so let that oven work its magic! -
Mix the dry ingredients
In a bowl, whisk together the flour, baking soda, salt, and cinnamon. This helps distribute the leavening agent evenly. Plus, it’s a great workout for your whisk! -
Combine the wet ingredients
In another bowl, cream the softened butter, brown sugar, and granulated sugar until light and fluffy. This one’s a little elbow grease workout, but it’s where all the magic starts! Add in the egg and vanilla, mixing until just combined. -
Combine wet and dry
Gradually add the dry mixture to your wet ingredients, mixing until just combined. Don’t over mix—keep that dough tender! -
Fold in the oats
Using a spatula, gently fold in the rolled oats. This is where the chewy goodness happens! -
Scoop onto a baking sheet
Use a cookie scoop or two spoons to drop rounded tablespoons of dough onto an ungreased baking sheet. Make sure to give them room, as they will spread a bit! -
Bake in the preheated oven for 10-12 minutes
You want them to look slightly golden on the edges but still soft in the center. They’ll firm up as they cool. -
Let them cool
Allow the cookies to cool on the baking sheet for a few minutes before transferring them to a wire rack. Be patient! They need to set up a bit. -
Prepare the filling
In a bowl, mix the marshmallow fluff and powdered sugar until smooth. -
Assemble the pies
Once your cookies are cool, spread a generous dollop of the marshmallow mixture on the bottom of one cookie, then sandwich it with another. Press gently to spread the filling out to the edges. -
Enjoy!
Dive right in, or if you can resist, chill them for 30 minutes for a firmer filling. Your choice!
Serving Suggestions
These pies are stunning as is, but if you want to elevate your presentation, here are a few ideas:
- Serve on a beautiful platter: A colorful, patterned platter makes these cookies pop!
- Add a dusting of powdered sugar: Lightly sprinkle powdered sugar on top for that “wow” factor!
- Pair with milk or your favorite nut milk: These pies are begging for a cold glass of milk by their side.
- Garnish with a drizzle of chocolate: Melt some chocolate and drizzle it over the top of the pies for an elegant touch.
Recipe Variations
Feel free to mix it up! Here are a few creative twists to try:
-
Chocolate Chip Oatmeal Pies: Fold in a cup of mini chocolate chips into the dough. Who doesn’t love a little chocolate?
-
Spiced Oatmeal Pies: Add an extra pinch of nutmeg or even some ginger to give it a spicy warmth, perfect for fall!
-
Coconut Oatmeal Pies: Mix in 1/2 cup of shredded coconut for a tropical flair. It adds chewiness and delicious flavor!
-
Nutty Delight: Fold in chopped walnuts or pecans for a crunchy texture.
-
Dairy-Free Vanilla Cream: Replace marshmallow fluff with a dairy-free vanilla frosting or whipped coconut cream for a lighter option.
Chef’s Notes
Every recipe has a story, doesn’t it? Here’s a little tidbit: the first time I made these, I got ambitious and decided to add more oats than the recipe called for. I ended up with oat-dough balls! While they were a form of a cookie, the flavor was fantastic, and my family loved them! It just goes to show; sometimes, mistakes lead to delicious discoveries.
Over the years, I’ve played around with the filling too, switching out marshmallow fluff for different creamy spreads and experimenting with the cookie base. Each attempt has been a delicious adventure, reminding me that cooking is all about experimenting and adapting!
FAQs and Troubleshooting
-
Why are my cookies flat?
Make sure your butter is softened and not melted, and double-check your baking soda is fresh! -
Can I make these in advance?
Absolutely! You can store the cookies in an airtight container for up to a week. Fill them just before serving to keep them fresh. -
How do I prevent my cookies from being too hard?
Underbake them slightly! Remove them from the oven when they’re still soft. They will firm up as they cool. -
Can I freeze these?
Yes! Place the unfilled cookies in a freezer bag. Then, fill them once thawed to maintain the best texture.
Nutritional Info (Optional)
These delightful Oatmeal Cream Pies will provide you with about:
- Calories: 230 per pie
- Fat: 9g
- Carbohydrates: 34g
- Protein: 2g
Of course, nutritional value will vary based on the specific ingredients you choose and any substitutions made. Always tailor and adjust to meet your dietary needs.
Now that you have my tried and true recipe for Oatmeal Cream Pies, it’s your turn to jump into the kitchen and create some magic! Tag me in your delicious creations, and let’s keep the food love rolling!
Happy baking, my friends! 🍪❤️