Cheeseburger Roll-Ups: A Fun Twist on a Classic Favorite
Hey there, food lovers! Lila here, and today I’m super excited to share a recipe that’s guaranteed to become a staple in your kitchen: Cheeseburger Roll-Ups! 🍔✨ If you’re like me, you probably have some fond memories tied to juicy burgers, whether it was that backyard barbecue with friends or a lazy Saturday night in. This recipe captures all those cheesy, beefy goodness vibes—and it’s super easy to make!
A Walk Down Memory Lane
I still remember the first time I made cheeseburgers on the grill. I was around twelve, and let me tell you, grilling meat was a whole new world for me! My dad was the grill master in our house, and I decided it was time to take the reins. I carefully shaped those patties, seasoned them perfectly, and was honestly convinced I was about to impress everyone in the neighborhood. But as it turned out, I was more interested in slapping the patties on the grill than actually checking the temperature. Cue the charcoal-flavored burger patties!
Despite that little mishap, I learned two important lessons that day: 1) always check your grill’s temperature and 2) burgers are more than just a meal—they’re a cherished memory. That’s why I love this recipe for Cheeseburger Roll-Ups! They’re not only a fun and creative way to enjoy the flavors of a cheeseburger, but they also allow for plenty of playing around in the kitchen without any of that grilling pressure!
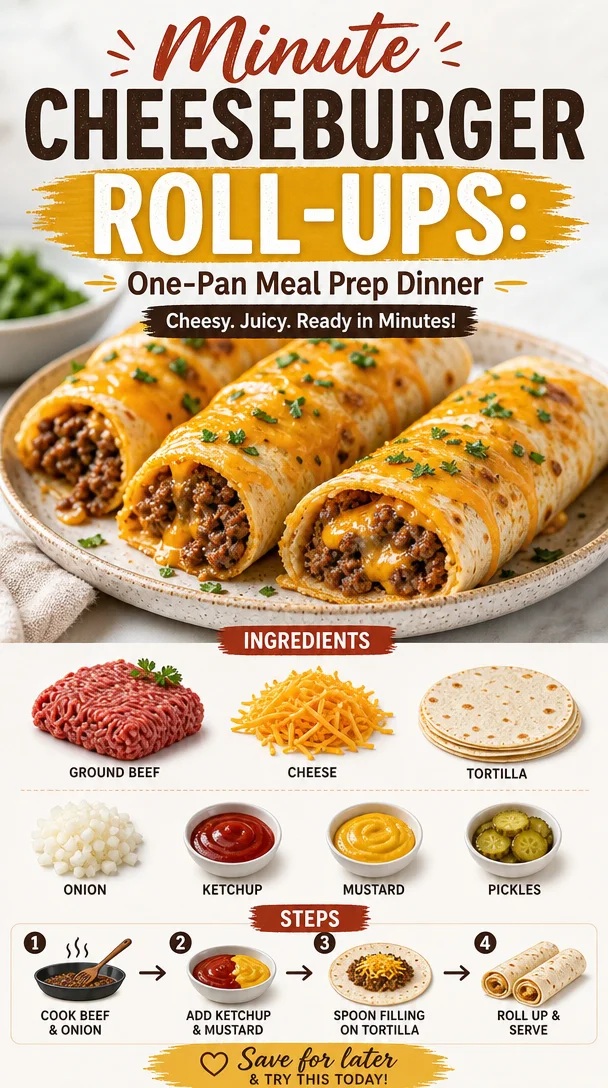
Ingredients
Let’s break down what you’ll need to whip up these tasty Cheeseburger Roll-Ups:
-
Ground Beef: The star of our show! Choose lean ground beef (80/20) for the best flavor. If you want something lighter, you can opt for ground turkey or chicken.
-
Cheese: Classic American cheese melts beautifully in this dish. However, feel free to swap it out for cheddar, Swiss, or even pepper jack if you want some heat!
-
Tortillas: You can use flour tortillas for those perfect roll-ups. For a healthier option, whole wheat or spinach tortillas can add an interesting twist—they’re great for sneaking in extra nutrients!
-
Onions: Chopped onions add a slight crunch and flavor pop. If you’re not a fan, you can leave them out or use scallions for a milder taste.
-
Pickles: A few dill pickle slices offer that classic cheeseburger tang. You can always use relish if you want that sweet-sour vibe or omit it altogether if you’re aiming for simplicity.
-
Ketchup and Mustard: For drizzling on top—just like your favorite burger! Feel free to swap in your favorite sauces; BBQ or sriracha sauce both work fabulously here.
Step-by-Step Instructions
Ready to roll? Let’s get cooking! Follow these steps to make your Cheeseburger Roll-Ups:
-
Prep Your Ingredients
- Dice your onions and chop your pickles. Set them aside in little bowls—they’ll be ready for action in just a bit.
-
Cook the Beef
- In a wide skillet, heat a drizzle of oil over medium-high heat. Once hot, add your ground beef. Here’s a chef hack: break it apart with a spatula to ensure it cooks evenly. Season it with salt, pepper, and any other spices you fancy (like garlic powder or paprika) to elevate the flavor!
-
Add Onions
- Once your beef is mostly cooked through, toss in the diced onions. Stir everything around until the onions turn translucent and fragrant, about 3-4 minutes.
-
Melt the Cheese
- Turn the heat down to low and lay the cheese slices right on top of the beef mixture. Cover the pan for a minute to let that glorious cheese melt perfectly over the beef. This is the moment you can almost hear the heavenly “ahhhh” sound!
-
Assemble the Roll-Ups
- Grab a tortilla, and spoon some of your cheesy beef mixture right down the center. Top with a couple of pickle slices and a drizzle of ketchup and mustard. Roll it up tightly, ensuring the filling doesn’t escape. Repeat this until you’ve filled all your tortillas!
-
Toast the Roll-Ups
- In the same skillet (or on a griddle), add a little more oil or butter if you’d like for extra crispiness. Place the roll-ups seam-side down in the pan and cook until golden brown and crispy. Flip them carefully to get both sides nice and crunchy. About 3-4 minutes per side should do it!
-
Slice and Serve
- Once they’re crispy and golden, take them out of the skillet and let them cool for a minute. Then, slice the roll-ups into bite-sized pieces and plate them up.
Serving Suggestions
These Cheeseburger Roll-Ups are fantastic on their own, but they can also be jazzed up a bit! Consider serving them with a side of:
-
Sweet Potato Fries: Oven-baked or air-fried, they’re naturally sweet and pair perfectly with that cheeseburger flavor.
-
Veggie Sticks: Carrots, cucumbers, and celery sticks for some crunch. Dip them in ranch or your favorite dressing for a refreshing bite!
-
Homemade Coleslaw: A creamy slaw adds a nice balance to the savory roll-ups and brings a little crunch to the table.
Recipe Variations
Let’s get a little creative! Here are some fun twists on this basic recipe:
-
Buffalo Chicken Roll-Ups: Swap the ground beef for shredded rotisserie chicken and toss it with buffalo sauce. Add some blue cheese crumbles for extra flavor!
-
Veggie Burger Roll-Ups: Use a plant-based meat substitute and load up on sautéed mushrooms, spinach, and veggie cheese for a vegetarian delight.
-
BBQ Chicken Roll-Ups: Substitute the beef with shredded BBQ chicken. Add diced red onion and cheddar cheese for a smoky, tangy twist!
-
Pizza Roll-Ups: Transform these into pizza roll-ups! Add pepperoni, marinara sauce, and mozzarella cheese instead of the beef for a fun game-day snack.
-
Breakfast Roll-Ups: Scramble some eggs with veggies and cheese, wrap them in tortillas, and you’ve got a breakfast that packs a flavor punch!
Chef’s Notes
Cooking is all about enjoying the process, so don’t be afraid to get a little wild with these roll-ups! Feel free to experiment with what you have in the fridge. I learned the hard way that not every kitchen mishap is a failure—like the time I accidentally added way too much garlic to a batch. Turns out, it was a hit! Now, I always keep that garlic love in mind when I’m messing around with recipes.
And hey, if you’re hosting a game night or just craving comfort food for yourself, these Cheeseburger Roll-Ups are your new go-to.
FAQs and Troubleshooting
1. What if my beef is too greasy?
If you find your beef is too greasy after cooking, you can drain some of the fat off before adding your cheese. It’ll still be just as delicious!
2. Can I make these ahead of time?
Absolutely! You can prepare the filling ahead of time, and then assemble and cook when you’re ready. Or, you can fully cook and store them in the fridge. Just pop them in the oven to reheat!
3. My roll-ups are falling apart!
If your tortillas are cracking, they may be too cold or dry. Try warming them in the microwave for about 10 seconds before wrapping. This makes them flexible and easier to roll!
4. How do I store leftovers?
Store any leftovers in an airtight container in the fridge for up to three days. You can reheat them in the oven or a skillet for that perfectly crunchy texture!
Nutritional Info
While I usually don’t dive too deep into nutritional details, here’s an estimate for one Cheeseburger Roll-Up:
- Calories: 220
- Protein: 15g
- Carbs: 20g
- Fat: 10g
Of course, calorie counts will vary based on your exact ingredients.
In the end, cheeseburger roll-ups are more than just a dish—they’re a fun way to bring family and friends together, spark conversations, and create joyful memories. So grab your ingredients, invite some loved ones, and let’s get rolling! Happy cooking! 🍴✨