Pita Pizza Pockets: A Whimsical Twist on a Classic Favorite
Hello, food lovers! I’m Lila from FoodieScroll, and today, we’re diving into a delightful dish that’s equal parts fun and satisfying — Pita Pizza Pockets! Whether you’re looking for a quick weeknight meal, a playful snack, or something to impress your friends, these little pockets of joy are the perfect solution. They’re simple, customizable, and oh-so-delicious! 🍕✨
A Cheesy Memory
Growing up, pizza night was a sacred tradition in my household. My family and I would gather around the table with a stack of magazines, eagerly flipping through recipes and toppings for our homemade masterpieces. My dad was an absolute pizza aficionado, and each week sparked a new conversation about crust thickness, sauce simmering times, or the merits of fresh basil.
But there was one night that stood out. Inspired by an impromptu pantry raid, we ditched the traditional round pizza and instead grabbed some pita bread. “Why not create personal-sized pizzas?!” my dad exclaimed, the excitement evident in his voice. Each of us crafted our own Pita Pizza Pocket, piled high with toppings and gooey cheese. The anticipation was electric as we slid them into the oven. The aroma that filled our kitchen was pure magic!
That night cultivated my love for cooking, creativity, and sharing meals with loved ones. These Pita Pizza Pockets aren’t just a dish; they’re a cherished memory that I’m thrilled to bring to you today!
Ingredients
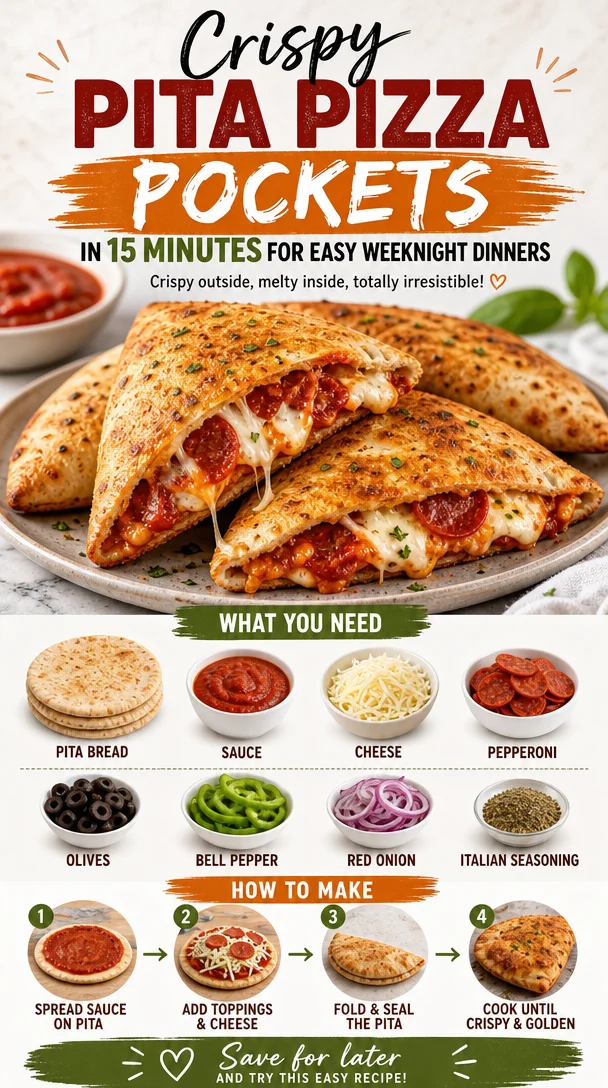
To craft your own Pita Pizza Pockets, you’ll need the following ingredients:
- Pita bread: The sturdy base for your pizzas! Choose whole wheat for a healthier option or traditional white for that classic flavor.
- Pizza sauce: Whether homemade or store-bought, pick a sauce that resonates with your taste buds. You can even swap for pesto or hummus for a unique twist!
- Cheese: Mozzarella is a no-brainer, but feel free to add cheddar, feta, or even vegan cheese for a dairy-free alternative.
- Toppings: These can be anything from pepperoni to bell peppers, olives, onions, and even pineapples! Get creative and make it your own.
Step-by-Step Instructions
Let’s get cooking! Follow these steps for perfectly baked Pita Pizza Pockets.
-
Preheat the oven: Preheat your oven to 375°F (190°C). This ensures your little doughy delights will bake evenly and efficiently.
-
Prepare the pita: Slice each pita in half, creating two pockets. You might want to gently press them down with your fingers to open them slightly — a little finesse goes a long way.
-
Spread the sauce: Use a spoon to spread a generous tablespoon of pizza sauce inside each pocket. Remember, sauce is key to flavor! You want that deliciousness to seep in.
-
Add the cheese: Sprinkle a handful of cheese into each pocket. Pro tip: combining different types of cheese adds depth and complexity to your dish!
-
Layer your toppings: This is where you can truly personalize your Pita Pizza Pockets. Add your favorite toppings and don’t be shy!
-
Bake ’em up: Arrange the stuffed pita pockets on a baking sheet lined with parchment paper (for easy cleanup!). Pop them in the oven and bake for about 10-12 minutes, or until the cheese is bubbly and the pita is golden brown.
-
Cool and serve: Let them cool for a minute, then serve with your favorite dipping sauce or a drizzle of olive oil for an elegant touch.
Serving Suggestions
Presentation is everything, right? Arrange your Pita Pizza Pockets on a vibrant platter, serve them with fresh basil leaves or a side of marinara for dipping. You could even garnish with a sprinkle of chili flakes or Parmesan cheese for that extra wow factor.
Recipe Variations
The beauty of Pita Pizza Pockets is their versatility! Here are some delightful variations to consider:
-
Mediterranean Twist: Use hummus instead of sauce and top with olives, feta cheese, and sun-dried tomatoes for a tangy flavor profile.
-
BBQ Chicken Delight: Swap the pizza sauce for BBQ sauce and top with shredded chicken, red onions, and cilantro for a smoky, satisfying meal.
-
Veggie-loaded Pocket: Load up on various vegetables like zucchini, mushrooms, and spinach for a vibrant, healthy option.
-
Breakfast Pizza: For a fun breakfast twist, crack an egg into the pita, add cheese, and toppings like bacon or spinach, then bake until the egg is set for a hearty morning treat!
-
Dessert Pita Pizza: For something sweet, spread Nutella inside, then top with slices of banana and mini marshmallows before baking to create a dessert to remember!
Chef’s Notes
Making Pita Pizza Pockets has become one of my favorite traditions, much like family pizza nights from my childhood. Sometimes I’ll invite friends over for a build-your-own-Pita-Pizza night. The chaos, laughter, and creativity that unfold are honestly the best!
A funny kitchen story? One time, I got so carried away adding toppings that my pita burst open while baking, resulting in an epic cheese explosion! Although it was a mess, it made for the best story and even better pizza.
FAQs and Troubleshooting
1. Can I make these ahead of time?
Absolutely! You can prepare the pockets ahead of time, cover them tightly, and store them in the refrigerator. Just bake them when you’re ready!
2. Why is my cheese not melting?
If your cheese isn’t melting properly, it may be too cold when it went into the oven. Always let your ingredients sit at room temperature for about 20 minutes before assembling for optimal melting.
3. Can I grill these instead?
Definitely! If you have a grill, you can cook them over medium heat for 2-3 minutes on each side. Just keep an eye on them to avoid burning!
4. What if I can’t find pita bread?
No worries! You can use naan, tortillas, or even English muffins as an alternative base for your pizza pockets.
Nutritional Info (Optional)
While I don’t focus too much on numbers, here’s a quick glance at the nutritional value of a basic Pita Pizza Pocket (per serving):
- Calories: ~250 (depending on toppings)
- Protein: 10g
- Carbohydrates: 30g
- Fat: 10g
Just adjust according to your chosen ingredients!
And there you have it — your guide to making unforgettable Pita Pizza Pockets! I hope this recipe inspires you to gather your loved ones, whip up a batch, and bring your own creativity to the table. Cooking is meant to be fun, so let’s scroll less, cook more, and indulge in flavors that excite our taste buds! Until next time, happy cooking! 🍕💖