The Ultimate Bagel Turkey Melt Recipe: A Delicious Twist on Two Classics
Hey there, fellow foodies! Today, we’re diving into a recipe that perfectly combines the gooey goodness of cheese with the heartiness of turkey, all wrapped in the comforting embrace of a bagel. Say hello to my Bagel Turkey Melts! These scrumptious bites are not only incredibly easy to whip up, but they also pack a punch of flavor that will make your taste buds dance. So, grab your apron and let’s get cooking!
A Nostalgic Bite: My Bagel Turkey Melt Story
You know, food has this magical way of teleporting you to different times and places. For me, one of my fondest memories comes from my childhood kitchen, where my mom would occasionally let me “help” with dinner. That often meant my idea of assistance was raiding the fridge for leftover turkey and whatever cheese we had on hand.
One day, I found a few bagels sitting on the counter, leftover from our Sunday brunch. I thought, “Why not make a super cheesy turkey sandwich on these bagels?” I layered them with turkey, cheese, a sprinkle of garlic powder, and then popped them in the oven until the cheese was gooey and the bagels crispy. I was gloriously proud of my creation! My family devoured those Bagel Turkey Melts, and that thrilling feeling of inventing something delicious has stayed with me ever since.
Now, I want to share this flavorful gem with you, so you’re bound to create some tasty memories of your own!
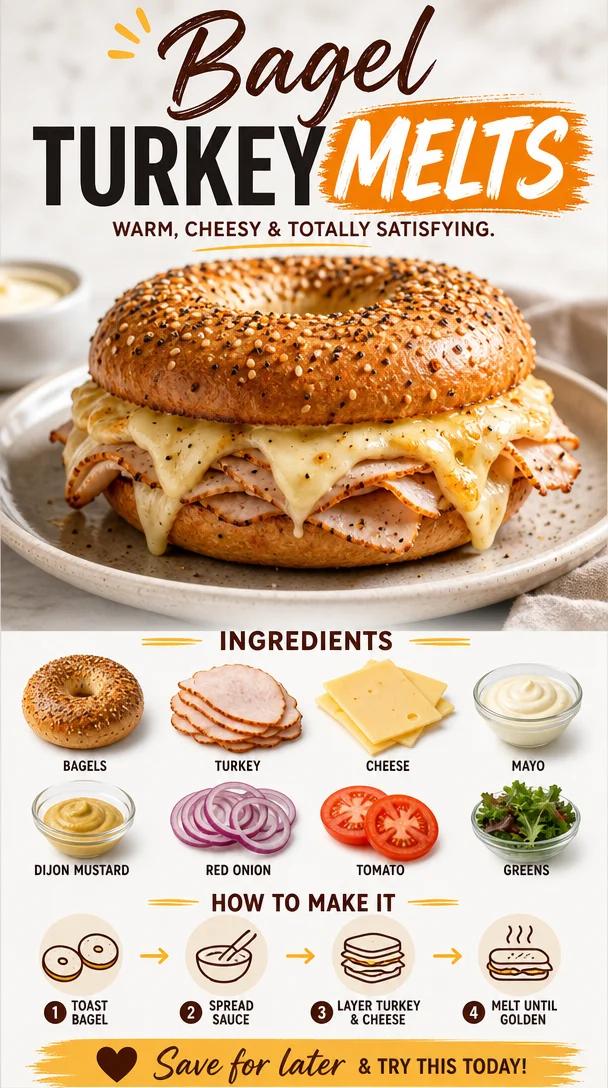
Ingredients
Here’s the lineup for your Bagel Turkey Melts:
-
Bagels: The star of the show! Use your favorite type—everything, plain, or even whole grain. If you need a gluten-free option, look for gluten-free bagels that suit your taste.
-
Turkey: Sliced turkey works best; deli turkey is ideal for a smooth texture. If you’re feeling adventurous, roast some turkey breast at home and slice it up!
-
Cheese: You can’t have a melt without cheese! I love using provolone or mozzarella for that stretchy goodness. If you’re more of a cheddar person, go ahead and use that! Swiss cheese is also an excellent alternative, giving it a unique, nutty flavor.
-
Butter: A little butter helps to achieve that crispy, golden outside on your bagels. Want to keep it lighter? Use a butter substitute or skip it—just note that the crispiness might be a tad compromised.
-
Optional Seasonings: Here’s where you can get creative—garlic powder, onion powder, or Italian seasoning can elevate your melt! Feel free to sprinkle any of these over the turkey for an extra kick.
Step-by-Step Instructions
Now that we’ve got our ingredients ready, it’s time to bring our Bagel Turkey Melts to life. Follow these easy steps, and you’ll be enjoying a delicious meal in no time.
Step 1: Preheat Your Oven
Preheat your oven to 375°F (190°C). This ensures that your bagels toast evenly, melting the cheese just right.
Chef Tip: If you’re using a toaster oven, it works just as well if you want a quicker heat-up!
Step 2: Prepare the Bagels
Slice your bagels in half (if they’re not pre-sliced). Place them on a baking sheet, cut side up.
Chef Insight: For an even crunchier texture, try toasting the cut sides in a skillet for a couple of minutes before the next step. It adds a nice flavor, too!
Step 3: Butter Those Bagels
Spread a thin layer of butter on the cut side of each bagel half. This will give it that golden-brown crunch we’re all after.
Pro Tip: Try using garlic butter for a twist!
Step 4: Layer on the Turkey
Next, pile on your sliced turkey over the buttered bagel halves. Use as much or as little as you like—don’t be shy!
Step 5: Add the Cheese
Now, this is where the magic happens! Generously layer the cheese over the turkey. The more, the better.
Chef Suggestion: Mix different cheeses for a blend of flavors!
Step 6: Season it Up
Sprinkle any seasoning you choose over the cheese to take the flavor up a notch.
Helpful Hint: Creating a small mixed spice blend with a pinch of salt, pepper, and garlic powder can turn simple into spectacular!
Step 7: Bake
Pop that baking sheet in the oven and let those beauties bake for about 10-12 minutes, or until the cheese is bubbling and golden.
Chef’s Note: Keep an eye on them—cheese can go from melty to burnt surprisingly fast!
Step 8: Serve and Enjoy
Once done, remove from the oven and let them cool for a minute (if you can wait!). Serve these warm and melty, perhaps alongside a side salad or some crispy veggie sticks for that perfect meal.
Serving Suggestions
When it comes to plating, I suggest keeping it simple to let the dish shine:
- Arrange your Bagel Turkey Melts on a rustic cutting board or platter.
- Garnish with some fresh herbs like parsley or chives for a pop of color.
- Serve with a side of your favorite dipping sauce, like a tangy mustard or a creamy ranch dressing—both complement the flavors beautifully!
Recipe Variations
While the classic Bagel Turkey Melt is undeniably delicious, there are plenty of ways to switch things up. Here are some creative variations:
-
Caprese Style: Swap out turkey for fresh mozzarella, add slices of tomato, and basil for a Caprese twist. Drizzle with balsamic glaze before serving!
-
BBQ Chicken Melt: Replace turkey with shredded BBQ chicken and add Monterey Jack cheese. A smoky flavor explosion!
-
Veggie Delight: Use roasted vegetables like zucchini, peppers, and red onions with a sprinkle of feta cheese for a vegetarian-friendly option.
-
Spicy Kick: Add sliced jalapeños or a drizzle of hot sauce before baking to turn up the heat!
-
Breakfast Melt: Add a fried egg on top before baking for an indulgent breakfast twist.
Chef’s Notes
As with all recipes, the Bagel Turkey Melt has evolved over time in my kitchen. I’ve experimented with countless other toppings, and I’ve learned that there’s no wrong way to make them! Whether you want something extravagant or keep it simple, these melts are the perfect canvas for your culinary creativity.
One of my funniest kitchen stories involves making these for a surprise brunch. I was working with a friend who later (and hilariously) mistook the butter for cream cheese when spreading it on the bagels. The giggles didn’t stop even once we bit into those ‘experimentations’—they were surprisingly still a hit!
FAQs and Troubleshooting
Q1: The cheese isn’t melting properly; what went wrong?
A: Make sure your oven is preheated adequately. Also, consider using a higher-moisture cheese, which generally melts better.
Q2: Can I use a different bread instead of bagels?
A: Absolutely! This recipe works great with any sturdy bread. Just adjust the toasting time as needed.
Q3: How do I store leftovers?
A: Store any leftover Bagel Turkey Melts in an airtight container in the fridge for up to 2-3 days. To reheat, pop them back in the oven or a toaster oven until warmed through.
Q4: I don’t have butter; can I skip it?
A: Yes, you can skip the butter, but you might miss that delightful crispy texture. Instead, use a little olive oil or cooking spray if you prefer.
Nutritional Info
While I didn’t calculate specific nutritional values, these Bagel Turkey Melts are a balanced option packed with protein from turkey and nutrients from any additional veggies you add.
Final Words of Encouragement
Cooking should always bring joy, and I hope you embrace this recipe just as much as I do. The Bagel Turkey Melt is a heartwarming dish perfect for any mood—whether you’re hungry after a long day or just in need of a comforting bite. Let’s scroll less, cook more, and create something unforgettable together!
Happy cooking! 🍴✨