Dive into Decadence: Black Forest Cupcakes
Hey there, fellow foodies! Lila here, and today we’re whipping up something that takes the classic Black Forest cake and transforms it into a delightful, individual-sized treat: Black Forest Cupcakes! 🍒✨ These cupcakes are more than just a dessert; they’re a flashback to childhood birthday parties, cozy family gatherings, and those special moments when chocolate and cherries combine to create pure bliss.
A Sweet Nostalgia
Let me take you back to my childhood — each year, my family would throw a big birthday bash for my dad, who absolutely adored chocolate and cherries. My mom would go all out for the dessert table, but the pièce de résistance was always her Black Forest cake. She’d layer moist chocolate sponge, tart cherries, and fluffy whipped cream, and let me tell you, it disappeared faster than we could say “Happy Birthday!”
As the years went by, I realized that not everyone has the patience for a multi-layered cake (or the time!). So, I decided to take that fantastic flavor combination and make it accessible. Enter the Black Forest Cupcake: easy to bake, delightful to eat, and guaranteed to bring a smile to your face.
So grab your apron and let’s get started on this delicious journey!
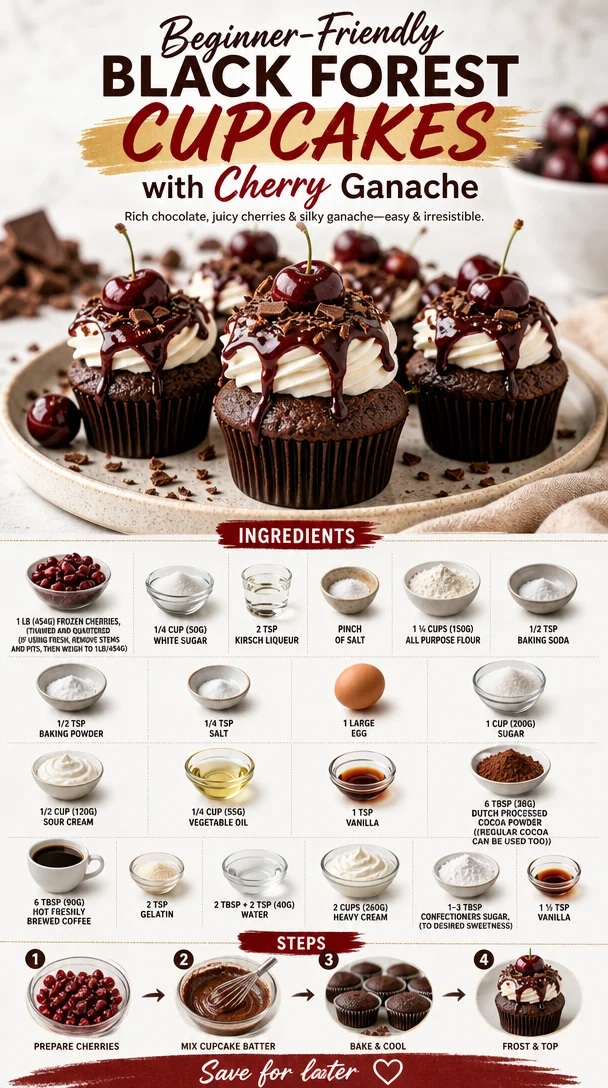
Ingredients
Before we dive into the baking, let’s gather our ingredients. Here’s what you’ll need:
-
1 lb (454g) Frozen Cherries (thawed and quartered)
- Fresh cherries can definitely step in too! Just remember to remove the stems and pits.
-
1/4 cup (50g) White Sugar
- Balances the tartness of the cherries beautifully. You can use coconut sugar if you’re looking for a healthier option.
-
2 tsp Kirsch Liqueur
- This cherry brandy adds a lovely depth of flavor. If you want to keep it non-alcoholic, just replace it with some cherry juice.
-
Pinch of Salt
- Just a touch enhances all the flavors.
-
1 ¼ cups (150g) All-Purpose Flour
- The backbone of our cupcakes. If you want a gluten-free option, go with a 1:1 gluten-free flour.
-
1/2 tsp Baking Soda
-
1/2 tsp Baking Powder
-
1/4 tsp Salt
- Together, they ensure our cupcakes rise perfectly.
-
1 Large Egg
- Acts as a binder. For a vegan substitute, you can use a flax egg (1 tbsp ground flaxseed mixed with 2.5 tbsp water, let it sit for a few minutes!).
-
1 cup (200g) Sugar
- Essential for sweetness. Feel free to reduce the amount if you’re not into super-sweet desserts.
-
1/2 cup (120g) Sour Cream
- Makes our cupcakes rich and moist. You could use Greek yogurt for a lighter twist.
-
1/4 cup (55g) Vegetable Oil
- Keeps the cupcakes tender. If you’d prefer the flavor of butter, feel free to substitute!
-
1 tsp Vanilla
-
6 tbsp (38g) Dutch-Processed Cocoa Powder
- Rich chocolate flavor! Regular cocoa can be used here, but Dutch-processed will give deeper notes.
-
6 tbsp (90g) Hot Freshly Brewed Coffee
- Coffee accentuates chocolate flavors so well. If you’re not a coffee fan, just use hot water.
-
2 tsp Gelatin
- Helps stabilize our whipped cream, so it stays fluffy and beautiful.
-
2 tbsp + 2 tsp (40g) Water
- For dissolving the gelatin.
-
2 cups (260g) Heavy Cream
- The star topping that makes everything better. You can swap it for coconut cream for a dairy-free version.
-
1-3 tbsp Confectioners Sugar
- Add to taste for sweetness!
-
1 ½ tsp Vanilla
- Because why not add more vanilla?
Step-by-Step Instructions
Step 1: Preheat the Oven
First things first, preheat that oven to 350°F (175°C). While it warms up, line a cupcake pan with your favorite cupcake liners.
Step 2: Prep The Cherries
In a bowl, toss the thawed and quartered cherries with ¼ cup sugar and 2 tsp Kirsch Liqueur. Let them sit for about 15-20 minutes to macerate. This step infuses them with so much flavor and creates a delicious syrup that will soak the cupcakes later.
Step 3: Assemble the Dry Ingredients
In another bowl, whisk together:
- 1 ¼ cups all-purpose flour
- ½ tsp baking soda
- ½ tsp baking powder
- ¼ tsp salt
- 6 tbsp cocoa powder
This mixture will be the building blocks of our chocolatey goodness.
Step 4: Blend the Wet Ingredients
In a large bowl, beat together the egg and 1 cup sugar until light and fluffy. Then, mix in the ½ cup sour cream, ¼ cup vegetable oil, and 1 tsp vanilla. Give it a good mix!
Step 5: Mix It All Together
Add the dry ingredients to the wet mixture along with the 6 tbsp of hot freshly brewed coffee. Stir until just combined — don’t overmix!
Step 6: Fill the Cupcake Liners
Pour the batter into your lined cupcake pan, filling each cup about 2/3 full. And here’s a chef hack for a perfect pour — use an ice cream scoop for even portioning!
Step 7: Bake Away!
Pop them in the preheated oven for about 18-20 minutes. You’ll know they’re done when a toothpick inserted into the center comes out clean. Let them cool completely on a wire rack.
Step 8: Whip It Good!
While your cupcakes cool, whip the 2 cups of heavy cream with 1-3 tbsp confectioners sugar and 1½ tsp vanilla until soft peaks form. This will be our light and fluffy topping.
Step 9: Gelatin Magic
In a small saucepan, sprinkle the 2 tsp gelatin over 2 tbsp + 2 tsp water, letting it sit for about 5 minutes until it blooms. Heat gently until dissolved, then allow it to cool slightly. Gently fold this into your whipped cream to stabilize it.
Step 10: Assemble Time
Now for the fun part! Take your cooled cupcakes, create a small well in the center of each, fill it with a spoonful of your cherry mixture, then top with the stabilized whipped cream. Feel free to pile it high — the more, the merrier!
Serving Suggestions
Plate these cupcakes on a beautiful cake stand or a rustic wooden board for a visually stunning display. Perhaps sprinkle some chocolate shavings or a drizzle of chocolate sauce on top for that ‘wow’ effect. Don’t forget a sprig of mint for an extra pop of color.
Recipe Variations
- Minty Fresh: Add a few drops of peppermint extract to the whipped cream for a peppermint twist.
- Nutty Flavor: Fold in chopped almonds or hazelnuts into the cupcake batter for a crunchy texture.
- Dairy-Free: Replace sour cream with coconut yogurt and heavy cream with coconut cream for a dairy-free delight.
- Add Spices: A pinch of cinnamon or nutmeg in the batter can elevate the flavor profile.
- Raspberry Remix: Swap the cherries for fresh raspberries for a different berry experience!
Chef’s Notes
I’ve come a long way from those joyful birthday parties, experimenting in the kitchen to perfect these cupcakes. What started as a labor of love has now turned into one of my favorite recipes to share! Each time I make these, I can’t help but reminisce about that first mouthful of chocolate cake with cherries. You can even make the batter the night before and bake it fresh in the morning — who doesn’t love waking up to the smell of freshly baked cupcakes?
FAQs and Troubleshooting
1. What if my cupcakes sink in the middle?
Don’t worry! This can happen if you overmix or underbake. Make sure to mix until just combined and keep an eye on the baking time.
2. How do I know when my whipped cream is ready?
Stop whipping when soft peaks form. If you over-whip, it turns into butter, and nobody wants that!
3. Can I freeze these cupcakes?
Absolutely! Just make sure to freeze them without toppings. When you’re ready to enjoy, let them thaw and add whipped cream right before serving.
4. How do I store leftovers?
Store any leftovers in the fridge in an airtight container. These are best enjoyed fresh, but they can last up to 2-3 days!
Nutritional Info
While these cupcakes are a sweet treat, enjoy them in moderation! Each cupcake packs a delightful punch of flavors, and they are worth every calorie.
And there you have it — scrumptious Black Forest Cupcakes that are a celebration in every bite! I can’t wait for you to try this recipe and create your own memories around it. Let’s make cooking fun and delicious together! Bon appétit! 🍰❤️✨