Dive into the Ultimate DIY Nacho Lunch Box! 🥳🌮
Hey there, fellow food lovers! Lila here, and today we’re taking a delicious trip down memory lane with a twist on a classic favorite: DIY Nacho Lunch Box! These little bundles of cheesy, crispy goodness are packed with nostalgia and fun, just perfect for sharing (or keeping all to yourself — I won’t judge!).
Imagine sitting in the cafeteria or at a picnic, surrounded by friends, the sun shining, laughter in the air, and a gooey plate of nachos in hand. Simple, satisfying, and oh-so-delicious! That’s the vibe we’re going for today.
So let’s roll up our sleeves, grab our ingredients, and prepare to create a lunch box that’s not just tasty but also customizable to fit your cravings and dietary needs. Are you ready? Let’s go!
A Little Kitchen Memory: Nacho Magic ✨
Before we dive into the nitty-gritty of this fabulous recipe, let me share a little story. Growing up, nachos were a staple in my household — and not just for game days. I remember Friday nights were nacho nights. My family and I would gather around the coffee table, plates piled high with chips, cheese, and all the goodies we could find in the fridge.
My dad had this magical ability to layer nachos like he was an artist at work. One layer here, a sprinkle of cheese there, and before we knew it, we had a masterpiece that vanished in mere minutes! It wasn’t just about food; it was about connection, laughter, and the simple joy of eating together.
Inspired by those memory-filled nights, I created the DIY Nacho Lunch Box — it’s not just a meal, it’s a way to spark those same warm fuzzy memories. Let’s make our own nacho magic!
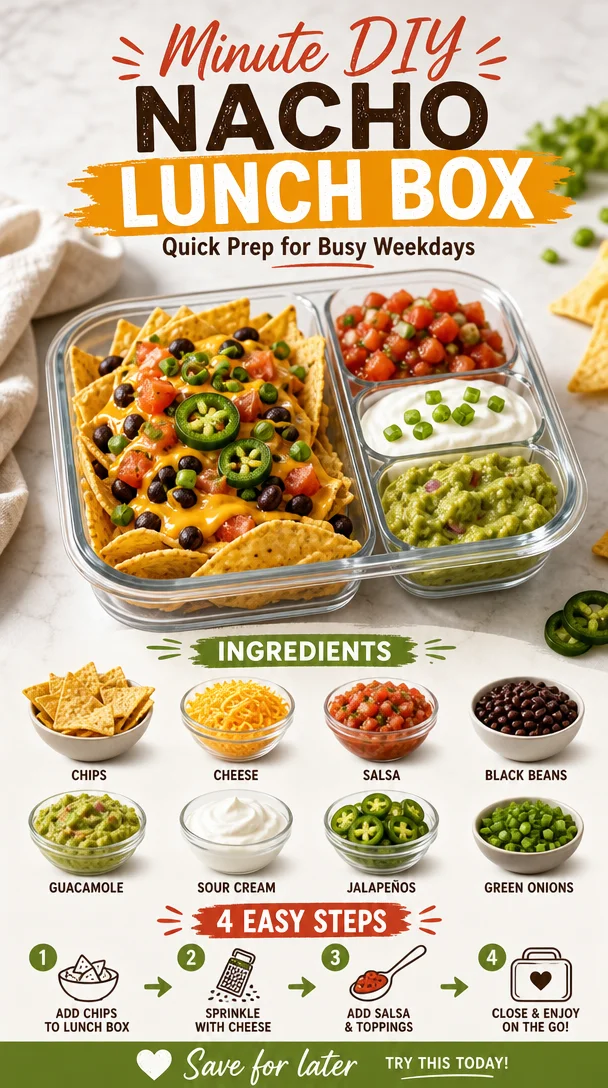
Ingredients: Your Nacho Box Essentials
Gather your ingredients! Here’s what you’ll need for your DIY Nacho Lunch Box:
-
Chips
- Insight: You can use any tortilla chips you love! Think plain, flavored, or even homemade baked chips for added nutrition. If you’re gluten-free, look for brands that specify their chips are safe for you!
-
Cheese
- Options: I recommend using shredded cheddar for that classic nacho flavor. But feel free to mix it up with Monterey Jack or Pepper Jack if you’re in the mood for a little kick. If you’re dairy-free, there are fantastic vegan cheese options available!
-
Salsa
- Chef Tip: Pick your favorite salsa — whether it’s mild, spicy, or somewhere in between. You can even make your own fresh salsa with tomatoes, onions, cilantro, lime, and a pinch of salt for that authentic taste!
Additional ingredients for fun additions:
-
Guacamole
- Fresh, creamy, and oh-so-delicious! You can either make it from scratch or grab a good-quality store-bought version.
-
Jalapeños
- For that extra kick! Fresh or pickled, they’ll add fantastic flavor to your nachos.
-
Sour cream or Greek yogurt
- Creaminess is a must! You can swap out sour cream for Greek yogurt if you’re looking for a healthier alternative.
Step-by-Step Instructions: Let’s Build It!
Now onto the fun part! Here’s how to assemble your glorious DIY Nacho Lunch Box:
Step 1: Prepare Your Chips
Grab a handful of your favorite tortilla chips and place them in the bottom of your lunch box or any other sturdy container.
Chef Hack: Don’t overcrowd the chips! You want to give them some space to hold all the glorious toppings you’ll be adding.
Step 2: Layer on the Cheese
Sprinkle a generous amount of shredded cheese over your chips. The more, the merrier!
Tip: For an extra melty experience, consider popping your whole lunch box (if safe) into the microwave for about 15-30 seconds before adding any cold toppings.
Step 3: Add Your Salsa
Next up, drizzle your salsa right over the cheesy chips. You can choose to keep it simple or go wild with a medley of different salsas!
Pro Tip: If you want to avoid soggy chips, keep the salsa in a small container next to the chips. This way, everyone can add just the right amount!
Step 4: Toppings Galore!
Now for the fun part! Load up on guacamole, jalapeños, and whatever else your heart desires.
Little Chef Insight: A little lime juice squeezed over the toppings can elevate the flavor like no other!
Step 5: Seal and Go
If you’re taking your nacho lunch box on the road, be sure to use a secure lid. You don’t want your masterpiece spilling everywhere!
Serving Suggestions: Let’s Plate It!
When it’s time to serve your nacho lunch box, here’s how to get that wow factor:
- Individual Layers: Consider packing the ingredients separately for a build-your-own nacho experience. This way, everyone can customize their own box!
- Presentation Matters: Use colorful containers or even a wooden board for a rustic feel. A sprinkle of fresh cilantro or some sliced green onions can really brighten things up!
- Dippin’ Fun: Include small cups of sour cream, extra salsa, or even a zesty queso dip on the side for added dips and drizzles.
Recipe Variations: Switch It Up!
Feeling creative? Here are some fabulous variations to keep you inspired:
- Southwest Chicken Nacho Box: Add cooked, shredded chicken seasoned with taco spices for a protein-packed twist.
- Caprese Nachos: Switch up the flavors with mozzarella, fresh basil, and cherry tomatoes drizzled with balsamic glaze for an Italian spin.
- Sweet and Spicy Nachos: Add some pineapple or mango salsa along with fresh jalapeños for a sweet kick.
- Mushroom and Spinach: Sauté some mushrooms and spinach ahead of time to add a hearty veggie option.
- Breakfast Nachos: Layer breakfast potatoes, eggs, and a variety of toppings for an amazing brunch option!
Chef’s Notes: The Nacho Journey
I’ve made these nachos a million different ways, and each time I discover something new! Sometimes, it’s about the mood or the ingredients I have on hand. The best part of creating your own nacho lunch box is that it’s all about you and what you love.
A funny kitchen story for you: I once tried to impress some friends by layering nachos so high that they toppled over everywhere. Let’s just say the nacho avalanche turned into a nacho catastrophe — but also an impromptu nacho party where we all gleefully dug into the mess!
FAQs and Troubleshooting: Your Burning Questions Answered!
-
Why are my nachos soggy?
- Solution: Make sure to keep wet ingredients like salsa and guacamole separate until you’re ready to eat. That way, your chips stay crispy!
-
What if I don’t have enough cheese?
- Pro Tip: Swap cheese for something like refried beans or even a drizzle of a cheesy sauce if you’re running low!
-
Can I make these ahead of time?
- Quick Answer: You can prep the ingredients a day in advance, but try not to assemble until just before serving to maintain freshness.
-
How can I add more protein?
- Suggestion: Try adding cooked beans, grilled chicken, or even a sprinkle of taco-seasoned beef for a hearty option.
Nutritional Info: A Quick Breakdown
Here’s a quick reference for nutritional info (per serving):
- Calories: Approximately 400-500 (variable based on toppings)
- Protein: 10-15g
- Carbs: 40-50g
- Fat: 20-25g
Feel free to adjust based on your specific ingredient choices!
Wrapping It Up
And there you have it! A delightful, customizable, and incredibly fun DIY Nacho Lunch Box that will bring a little extra joy to your lunchtime — or anytime you need a snack that bites back! So grab your chips, gather those toppings, and let the nostalgia flow.
Let’s keep scrolling less and cooking more because every meal should be an adventure. Happy cooking, my cheesy friends! 🍴✨