Creamy Gluten-Free Cheesecake: A Slice of Heaven
Hey there, fellow foodies! Lila here, and today, I’m thrilled to share one of my absolute favorite dessert recipes: a creamy Gluten-Free Cheesecake that is bound to impress. Whether you’re treating yourself or hosting a gathering, this cheesecake is the perfect indulgence with its smooth texture and delightful flavors. So grab your apron, and let’s dive into this delicious journey!
A Sweet Memory
As I reminisce about my childhood, one of my most treasured memories revolves around my mom’s cheesecake. Every special occasion called for a celebration, and there was always a creamy cheesecake at the center of our family table. The moment I’d take a bite of that luscious, rich dessert, all my worries seemed to melt away. The buttery crust paired with the velvety filling made it the star of the show.
Fast forward to a few years ago when I decided to create my version that not only honors that classic recipe but also caters to my gluten-free friends. This Gluten-Free Cheesecake is just as decadent and delicious as my mom’s, and trust me, it will take you on a trip down memory lane too!
Ingredients
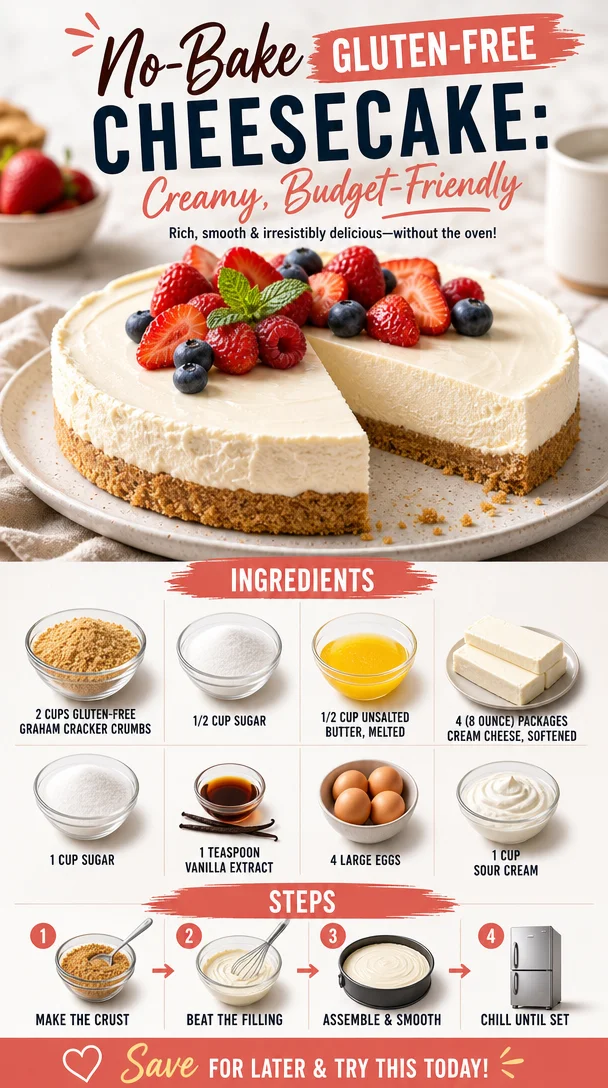
Let’s get to the good stuff! Here’s what you’ll need for a perfect Gluten-Free Cheesecake:
-
2 cups gluten-free graham cracker crumbs
This will form the base of your cheesecake. Look for brands that ensure they’re truly gluten-free. If you can’t find gluten-free crackers, crushed almonds or gluten-free biscotti can work wonderfully! -
1/2 cup sugar
Sweetens up that graham cracker crust and gives it a delicious hint of sweetness. You can also use coconut sugar or a sugar substitute if you’re watching your sugar intake. -
1/2 cup unsalted butter, melted
This binds the crust together and adds richness. If you’re looking for a dairy-free option, coconut oil is a fantastic substitute. -
4 (8-ounce) packages cream cheese, softened
The star of the cheesecake! Make sure it’s at room temperature to get that silky smooth texture. If dairy isn’t your friend, vegan cream cheese will work as a great alternative. -
1 cup sugar
This will sweeten the filling. You can use a bit less to your taste or opt for honey or maple syrup for a natural sweetener. Adjust as necessary since they have different sweetness levels. -
1 teaspoon vanilla extract
Adds a beautiful depth of flavor. Always opt for pure vanilla extract; it really makes a difference. -
4 large eggs
These help to set the filling and give it that creamy consistency. For a vegan option, you can use flax eggs (1 tablespoon ground flaxseed + 2.5 tablespoons water = 1 egg). -
1 cup sour cream
Adds a delicious tanginess and enhances the creaminess. If you’re dairy-free, try using coconut yogurt for a similar texture and flavor.
Step-by-Step Instructions
Alright, we’ve got our ingredients ready, so let’s get cooking!
Step 1: Preheat Your Oven
Preheat your oven to 325°F (165°C). This will make sure your cheesecake bakes evenly and nicely.
Step 2: Make the Crust
In a bowl, mix the gluten-free graham cracker crumbs, sugar, and melted butter until well combined. You want it to have a sandy texture that holds together when pressed.
Chef Tip: If you want a little extra flavor, you can add a pinch of cinnamon to your crust mix.
Step 3: Assemble the Crust
Press this mixture firmly into the bottom of a 9-inch springform pan. Make sure it’s evenly distributed, as this sets the foundation for your cheesecake.
Chef Tip: Use the back of a measuring cup to really pack it down—makes it easier for slicing later!
Step 4: Prepare the Filling
In a large mixing bowl, beat the softened cream cheese until it’s smooth and creamy. Start on low speed to avoid splatters, then crank it up.
Funny Story: I once tried to blend cold cream cheese, and let’s just say—splash zone!
Step 5: Add Sugar and Vanilla
Add in the sugar and vanilla extract. Beat until combined. You’re looking for a light and fluffy texture here.
Step 6: Introduce the Eggs
Add eggs, one at a time, mixing well after each addition. This step is crucial for keeping your texture smooth.
Chef Hack: Scrape down the sides of your bowl to ensure everything incorporates evenly.
Step 7: Incorporate the Sour Cream
Finally, add in the sour cream and mix until you have a velvety batter without lumps.
Step 8: Pour and Bake
Carefully pour the cheesecake filling over the crust in the springform pan. Bake in your preheated oven for about 60-70 minutes or until the edges look set but the center still has a slight jiggle (it will continue to firm up as it cools).
Chef Tip: A water bath can help prevent cracking, wrap the outside of your springform pan in foil and place it in a larger pan filled with water.
Step 9: Cool Down
Once done, turn off the oven and crack the door open. Let the cheesecake cool in the oven for about an hour. This slow cooling helps to avoid cracks.
Step 10: Chill
Transfer the cheesecake to the fridge and let it chill for at least 4 hours, preferably overnight. This allows it to firm up perfectly.
Serving Suggestions
When it’s time to serve your cheesecake, remove it from the springform pan. You can leave it plain, but why not take it a step further? Here are some ideas:
- Garnish with Fresh Berries: Strawberries, blueberries, or raspberries add a pop of color and freshness.
- Drizzle with Chocolate Sauce: For the chocoholics among us, a warm chocolate drizzle takes this dessert to the next level.
- Dust with Powdered Sugar: A light dusting just before serving adds a beautiful finish.
Recipe Variations
Now that you’ve got the classic gluten-free cheesecake down, let’s have some fun with variations!
- Chocolate Swirl Cheesecake: Melt 1 cup of chocolate chips and swirl into the filling before baking for a chocolate lover’s dream.
- Berry Cheesecake: Blend fresh berries into the filling for a fruity twist or top with a berry compote to enhance the flavor.
- Lemon Cheesecake: Add the zest and juice of 1 lemon to the filling for a refreshing citrus flavor.
- Pumpkin Spice Cheesecake: Stir in 1 cup of pumpkin puree and 1 teaspoon of pumpkin spice for a fall favorite.
- Nutty Biscoff Crust: Swap the graham cracker crumbs for crushed gluten-free Biscoff cookies for a unique flavor.
Chef’s Notes
This recipe has come a long way since my early kitchen experiments! I remember my first cheesecake attempt; it was a complete disaster—doughy, burnt, and oh boy, that was no fun. But with trial and error (and some amazing resources), I perfected this recipe that gives me nostalgia while still catering to today’s gluten-free needs.
Cooking should be an adventure. So whether you nail this on the first try or make a few missteps, enjoy every moment in the kitchen. Remember, even the greatest chefs have had their share of kitchen flops!
FAQs and Troubleshooting
1. Why did my cheesecake crack?
Ah, the classic cheesecake dilemma! Cracking often happens due to rapid temperature changes. Cooling slowly in the oven and ensuring your ingredients are at room temperature can help.
2. My cheesecake doesn’t seem to set. What happened?
It sounds like it might need more time in the refrigerator. Cheesecakes often firm up significantly after chilling, so give it some time!
3. Can I freeze this cheesecake?
Absolutely! Wrap it tightly in plastic wrap and aluminum foil. It should hold well for up to three months. Just thaw it in the fridge overnight before serving.
4. What if I want to make mini cheesecakes?
You can totally make these in muffin tins or small jars! Just adjust the baking time to around 15-20 minutes, so keep an eye on them.
Nutritional Information
For those of you who like to keep an eye on nutritional content, here’s a rough estimate per serving (based on 12 servings):
- Calories: 378
- Total Fat: 28g
- Saturated Fat: 17g
- Cholesterol: 94mg
- Sodium: 260mg
- Total Carbohydrates: 27g
- Dietary Fiber: 1g
- Sugars: 18g
- Protein: 6g
(Note: Nutritional values may vary depending on specific brands used and individual portion sizes.)
And there you have it, folks! A delightful Gluten-Free Cheesecake that’s sure to become a staple in your dessert repertoire. Remember to share your creations with me; I would love to see your cheesecake masterpieces! Happy baking! 🍰✨