Amish Cinnamon Rolls: A Sweet and Heartfelt Journey Through the Kitchen
Ah, cinnamon rolls — is there anything more comforting, more nostalgic than a batch of these delightful, pillowy treats? The smell wafting through the house, swirling your senses in a warm embrace, and beckoning everyone to gather around. As I think back to my childhood, I can’t help but smile, remembering those Sunday mornings filled with the anticipation of pulling a tray of freshly baked cinnamon rolls from the oven. The way they puffed up beautifully, glistening with sticky, sweet goodness. It was pure magic.
Today, we’re diving into the world of Amish Cinnamon Rolls, a recipe that embodies simplicity and flavor. Not only are these rolls a complete labor of love, but they also come packed with tradition. If you’ve ever wanted to create a warm, inviting atmosphere filled with the enchanting aroma of cinnamon and sugar, you’re in the right place. So, let’s roll up our sleeves and get cooking!
Personal Story: The Sunday Morning Tradition
Every Sunday as a kid, my grandmother would invite the family over for brunch. Her specialty? Cinnamon rolls that could make even the grumpiest of early risers crack a smile. With each inhale of that sugary, spiced air, I felt like I was stepping into a warm hug. I can vividly remember peeking over the counter, eyes wide with wonder as she kneaded dough and layered it with brown sugar and cinnamon.
One Sunday morning, my cousin and I decided to "help." We ended up with flour in our hair, and cinnamon on our noses, but the memories — oh, the memories! These rolls became a family staple, and each bite told the story of love, laughter, and the joint effort of everyone in the kitchen. Now, years later, I’m thrilled to pass on this cherished recipe to you, so you can create your own culinary memories.
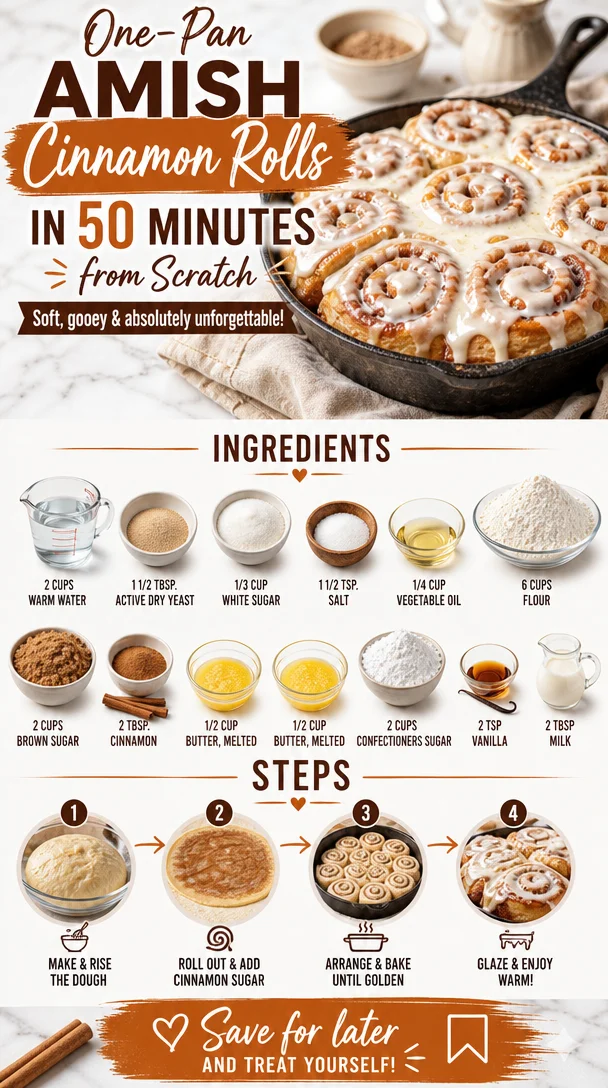
Ingredients
Let’s gather our ingredients before we transform our kitchen into an aromatic bakery:
-
2 cups warm water: This is the base of our dough. Ensure it’s warm (not hot) to activate the yeast properly. If you don’t have warm water, feel free to substitute with milk — it adds a lovely richness!
-
1 1/2 tbsp. Active Dry Yeast: The magic ingredient that makes our rolls rise. If you’re out of active dry yeast, you can swap it for instant yeast (the same amount is fine).
-
1/3 cup white sugar: Sweetness that brightens up the dough. You could use coconut sugar if you want a more earthy flavor.
-
1 1/2 tsp. salt: Every great dish needs a touch of salt to balance the sweetness — think of it as the unsung hero of baking.
-
1/4 cup vegetable oil: This gives our dough a tender texture. Olive oil can be a lovely substitute, adding a slight fruity flavor.
-
6 cups flour: For the dough’s structure. If you want to go half whole wheat, it’ll still turn out delicious and adds extra nutrition.
-
2 cups brown sugar: This is where the sticky, gooey goodness comes from. Dark brown sugar will give a deeper and richer flavor.
-
2 tbsp. cinnamon: Can you even have cinnamon rolls without cinnamon? If you want to be adventurous, try adding a pinch of nutmeg for a warm spice twist!
-
1/2 cup butter, melted: This keeps the roll filling moist and decadent. If you’re dairy-free, coconut oil could work instead.
-
2 cups confectioners’ sugar: For that dreamy frosting. You can use powdered erythritol if you’d like a low-sugar option.
-
2 tsp vanilla: A flavor enhancer that brings everything together. Feel free to use almond extract for a different flavor profile.
-
2 tbsp milk: This thins our frosting to just the right consistency. Any non-dairy milk works too, like almond or oat milk!
Step-by-Step Instructions
Let’s make these cinnamon rolls step by step, shall we?
-
Activate the Yeast: In a large mixing bowl, combine the warm water and active dry yeast. Stir gently and let it sit for about 5-10 minutes until frothy. This means your yeast is alive and ready to work its magic! If it doesn’t foam, your yeast might be old, so it’s time for a fresh batch.
-
Mix the Dough: Add the sugar, salt, and vegetable oil to the yeast mixture. Give it a good stir! Gradually mix in the flour, one cup at a time, until it forms a soft dough. Don’t worry about being perfect; a little stickiness is okay.
-
Knead the Dough: Turn the dough out onto a floured surface and knead for about 5-10 minutes until smooth and elastic. This is where the magic happens! Get your body moving and have some fun — it’s a great workout.
-
First Rise: Place the kneaded dough in a greased bowl, cover it with a clean towel, and let it rise in a warm spot for about 1-2 hours, or until it doubles in size. It’s like watching a balloon inflate!
-
Prepare the Filling: While the dough is rising, mix the brown sugar and cinnamon in a bowl. This filling is where all those cozy flavors come together, so make sure you mix it well.
-
Shape the Rolls: Once your dough has risen, punch it down gently to release some of the air. Roll it out into a rectangle (about 16×24 inches) on a floured surface. Brush the melted butter over the dough, then spread the cinnamon-sugar filling evenly on top.
-
Roll It Up: Starting from the long edge, roll the dough tightly toward the other end. Pinch to seal the seam. It’s like giving your dough a cozy hug!
-
Slice and Arrange: Cut the log into 12 equally-sized rolls. You can use unflavored dental floss for cleaner cuts — just slide it underneath the roll, cross it over, and pull. Place them in a greased pan, with each roll nestled close together.
-
Second Rise: Cover the rolls again with a towel and let them rise for another 30-60 minutes until they’ve puffy and are almost touching each other.
-
Bake: Preheat your oven to 350°F (175°C). Bake the rolls for 25-30 minutes, or until they’re golden brown. The aroma will be irresistible!
-
Make the Frosting: In a mixing bowl, whisk together the confectioners’ sugar, vanilla, and milk until smooth. If it’s too thick, add a splash more milk until you reach the desired consistency.
-
Frost and Serve: Once the rolls are out of the oven, let them cool for a few minutes before drizzling your frosting over the top. It will melt into all the warm crevices, creating gooey perfection.
Serving Suggestions
To plate your masterpieces, I suggest serving these rolls warm, straight from the oven. Place them on a colorful cake stand for a sweet centerpiece. You can garnish with a sprinkle of cinnamon or a few crushed nuts to add texture and visual appeal. Pair your delicious cinnamon rolls with a hot cup of coffee or a creamy latte, and you’ve created the ultimate comforting experience.
Recipe Variations
Feeling creative? Let’s explore some playful twists you can try with this base recipe!
-
Nutty Delight: Add 1 cup of chopped nuts (walnuts or pecans) to the filling for an extra crunch.
-
Cream Cheese Filling: Swap half the butter in the filling with cream cheese for a rich, tangy twist.
-
Chocolate Lovers: Fold in chocolate chips into the filling or drizzle melted chocolate on top instead of frosting.
-
Fruit Explosion: Add a layer of your favorite jam or sliced fresh fruit (like strawberries or apples) into the filling for a fruity surprise.
-
Caramel Swirl: Add caramel sauce to the filling and top the rolls with a drizzle of warmed caramel after baking.
Chef’s Notes
Making Amish Cinnamon Rolls is more than following a recipe; it’s about the experience of joyful creation and sharing. If you ever find you’re having trouble getting the rolls to rise, it could be that your kitchen is a little too cool. Don’t sweat it! Preheat your oven for a moment, then turn it off, and let the rolls rise in that warm environment.
And remember, as much as this recipe is rooted in tradition, don’t be afraid to tweak it! The beauty of cooking is making it your own — adding your flair, your flavors, and most importantly, your love.
A funny kitchen story? Oh, I’ve had my share! One time, I got so excited while baking that I ended up adding way too much cinnamon—not that I mind a strong cinnamon flavor, but my kitchen looked like a snowstorm had hit! A good reminder to always measure — but also to embrace those messy kitchen moments that turn into great stories.
FAQs and Troubleshooting
1. Why do my cinnamon rolls not rise?
If your rolls aren’t rising, check your yeast. It might be old. Also, ensure you’re letting it rise in a warm place — that’s key!
2. Can I prepare the rolls ahead of time?
Absolutely! You can make the dough the night before and keep it in the refrigerator. Just let it sit at room temperature for about an hour before you roll it out.
3. What if my rolls are too doughy?
If they came out grayer or too dense, it may be due to undercooking them. Keep an eye on your oven temperature — every oven is a little different!
4. Can I freeze cinnamon rolls?
Yes! After you cut and arrange them in the pan, cover and freeze. To bake, let them thaw and rise for about an hour before baking.
Nutritional Info
While sweet indulgences shouldn’t be a daily occurrence, these cinnamon rolls can still fit into a balanced diet. Each roll (without frosting) has approximately:
- Calories: 250
- Total Fat: 8g
- Carbohydrates: 39g
- Sugars: 10g
- Protein: 4g
Remember, moderation is key, and the joy of sharing homemade treats is what truly counts!
As we wrap up this cinnamon roll adventure, I hope you feel empowered to tackle this recipe in your own kitchen. They’re not just rolls; they’re a heartfelt connection to tradition, joy, and those sweet, sweet memories. Let’s scroll less, cook more, and fill our homes with love and laughter. Happy baking! 🌟🍴